Each person gathers items that they think would be relevant to our times and interesting to the aliens that uncover the time capsule a million years from now. Photos of items can substitute for the item itself. A family welcome message: “Welcome to Earth”
Coil pots have been made since the invention of the pottery wheel in Greece in 2500 BC! There’s a reason they are still being made today…Coil Clay Pots are beautiful, have unlimited design and size possibilities and are useful!
We’re guessing you kids know their way around a jar of play dough, which will make this project a snap! You only need one thing: air-dry clay and there are a ton of color choices!
How easy is this project? Basically, anything you can make with play dough, you can make with air-dry clay and create your own clay pot!
Combine different designs and build until your heart’s content!
In order for your pot will serve to actually hold things, make sure to start with a base and build from there.
Make sure to follow the directions on the package for drying time. You can expect to have to let your kid’s creations sit for about a week before they are fully dry and ready to be used. So if you use this one to make homemade gifts, be sure to plan ahead!
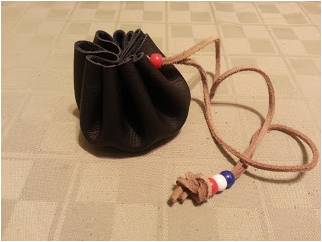
It’s easier than you think for your kids to make their own Medicine Bags! Medicine bags were used for exactly what it sounds like…medicine! Hundreds of years ago, medicine was made from various plants that were used by either eating, being steeped as a drink or they could be muddled, made into pastes or rubs. These bags held the various remedies so they were easily accessible and today can be used to hold all of your kid’s valuables (you know, rocks and stuff).
You’ll need:
A piece of fabric (thicker fabric works best and felt is a great option). The bigger the piece, the bigger your bag. A 12″ diameter piece will make a bag that stands about 4″-5″ tall.
A piece of cord: you can use a shoestring, yarn, or a leather cord. The cord needs to be about 6″-8″ longer than the diameter of your fabric.
Cut the fabric into a circle
Mark holes around the edge of the fabric, about 1/2″ from the edge. They should be about 2″ apart.
Use a hole punch to create the holes
Tie a knot into one end of the cord and start weaving the cord in and out of the holes. When you get back to where you started, add some beads to the ends (beads can also be used to slide up and down the cords and keep the bag shut. tie the two ends together,
Pull on the cord to cinch the bag closed and you’re done!
The art of basket weaving is thousands of years old and is an easy craft for your young ones. They’ll be able to practice their fine motor skills and hand-eye coordination while making beautiful and useful gifts.
Bowls can be made to hold keys, toys, jewelry…anything! Using different colored yarn and different sized bowls, you can make one for every holiday or special celebration.
All you need is a paper bowl, yarn (play around with mixing different colors) and scissors.
Cut a slit form the rim of the bowl to the flat base – don’t go too deep into the bowl, just to where the flat part starts.
Make slits about 2″ apart. For a 6″ diameter bowl, that’s about six slits. You’ll want to make sure there are an odd number of flaps.
Cut a 3′ piece of yarn and tie it at the base of one of the flaps – it doesn’t matter where you start.
Weave the yarn in and out of the slits of the bowl until the yarn runs out.
Tie a 2′ piece of yarn in another color to the end of the first piece and continue weaving the yarn in and out of the slits.
Continue this process, adding different colors as you go and experimenting with different lengths.
When the whole bowl is covered, tie off the end and admire your work!